Profitec Pro 300/troubleshooting
From Whole Latte Love Support Library


My Machine Has No Power, Pops GFCI
Is the machine plugged in to a GFCI outlet?
- Yes.
- If you’d like to get in to the machine yourself, make sure the machine is off and unplugged. On the bottom of the machine, you will see a metal plate being held in by four 3 mm bolts. Remove this plate and you will have access to the element of the steam boiler. Remove the two connectors from the element. At this point plug in the machine and flip the power switch. If the machine turns on, the element is more than likely faulty.
- No.
- Try testing another appliance on the same outlet. Does this appliance have power?
- If Yes, we recommend having the machine serviced by a tech.
- No. The problem is your outlet.
There is no Water flow at all
If the pumps runs, and no water is coming out, make sure that the water tank is seated properly into the socket on the water res support.
- Remove the water softener if you are using one. Old filters can get mucky and may need to be re-filtered, or may need to be replaced. Try running the machine without a filter.
- We can try force priming the machine. Remove the cover for the water res and remove the water res as well. The upper cup warmer is held in by 4 2.5mm screws. Two are in the front two corners of the upper cup warmer as well as in the rear two corners. Once the top is removed looking down into the machine you will find a total of 2 3mm screws, one on each side, that hold the sides of the housing in place, these can be a little difficult to remove due to it being so close to the housing that it does not leave a lot of room for your tool. Once those are removed, rest the machine on its back on a towel or pad and you will find 4 3 mm screws. These 4 hold the bottom of the housing to the frame of the machine. Once removed the machine can be returned to the upright position. In the “L” like section of the sides of the housing there is a screw with a brass bushing, this slides into the frame and holds the housing in place, there is also a metal tab as well that holds the housing to the front of the frame. Tap down on the top of the housing with your hand until it drops down, pull the side of the housing outward away from the machine, may have to wiggle it a bit as you do this, to free the brass bushing from the channel it sits in in the frame, once this has popped out you can work the metal tab out of its position against the fram. Repeat this for the other side, once both sides are free, slightly pull the housing sides outward away from the machine and slide it back off of the machine.
- Looking at the back of the machine, you will see the water reservoir support. Inspect the plastic socket to make sure there is no damage. Look inside the socket where you will find a plastic shaft that runs through the center of it. This is a molded piece of the socket that when the tank is inserted the shaft pushes on a ball bearing in the valve of the water reservoir and allows water to escape the tank into the socket. If this plastic shaft is broken or bent to the side, it will not make contact and not allow water to be drawn in. Make sure the socket itself is intact, sometimes during shipping, age, or someone pushed far too hard with the tank. The socket will snap, leaving only the top if it secured to the reservoir support, giving the illusion the socket is there, so when the water tank is inserted it just rests inside the remaining, broken portion of the socket.
- Inspect the water line coming off of the socket, this should have no kinks in it. If the water line is kinked it will prevent any water from being drawn in. If the water line is fine, then we can try priming the pump. Using either a prime ball or a turkey baster, fill it with water, disconnect the waterline from the socket, insert the primeball/turkey baster into the waterline, turn the machine on and lift the lever, while the pump is running, squeeze the prime ball/turkey baster. If you feel a small amount of resistance and then the water starts going through with ease, you should be fine to put the waterline back onto the socket. Insert the water tank, and try running the pump again while watching the water level in the tank. You should be able to see the level going down if the pump is now drawing water. At this point you will be able to put the panels back on the machine. If there is resistance and the water is not going through, either the pump is very locked up, or there is a blockage in the system and may need to be serviced.
Flip the brew toggle switch. Can you hear the pump?
- No.
- If the pump does not come on you Try to listen if you can hear a slight hum, if the pump is displaying a low frequency hum it is either under pressure due to a blockage, or the pump is faulty
- If the pump does not activate at all it could be an issue with the brew toggle switch, a wire has come of the switch, a wire has come undone from the pump, or there is an electrical issue with the machine maybe due to a faulty control board.
- Also check to make sure that the machine is able to sense the tank is full and in place. If the light is not activated to represent this, then look towards the above section for trouble shooting the tank. .
- Yes. Move on to I Have No Water Flow At All From The Group
There is no water coming out when I open the water valve.
- Check to make sure there is steam pressure present, inspect the steam gauge to see if the machine has heated fully.
- You can remove the hot water tap tip and try opening the valve. If flow is restored,open the hot water tip and make sure there is not build up present before or on the screen. If there , the screen can be removed and cleaned.
- If no water comes through after the tip has been removed, then there may be a blockage in the valve, or pipe leading to the valve. Remove the housing to the machine and undo the copper pipe that connects to the back of the valve. Inspect the back of the valve and inspect the end of the copper pipe, if both of these are clear and free from debris or scale, there could be a blockage on the boiler side. Service should be recommended to have the hydraulic system descaled.
How to Diagnose Hot Water and Steam System Obstructions
There is no steam coming out when I open the steam knob
- Verify that the machine has been on long enough and there is steam pressure built up within the machine. Inspect the steam gauge and make sure that there is steam pressure displaying there.
- Also make sure that the steam switch on the front of the machine has been flipped on, if it has not then the machine will not heat the steam boiler. If it has and there is not heat for the steam boiler than it could be an issue with the toggle switch itself for the steam function.
- If Steam pressure is being displayed but no steam comes out when the valve is opened, remove the steam tip and open the valve and see if steams comes out. If steam does come out then clean the tip the may have become blocked off by debris or old milk.
- If steam does not come out there could be a blockage of the valve, remove the top of the machine and with the machine off and the boiler depressurized, remove the copper line off the back of the valve. Inspect to see if there is a clear blockage of the valve with either debris or scale either in the back of the valve, or the copper pipe. If there is not then it could be a block on the boiler side of the machine. Take the top off of the machine and locate the copper pipe that runs from the back of the steam valve to a brass “T” that screws into the top of the steam boiler. This copper tube can be removed and the pipe and the opening of the “T” can be inspected for a blockage.
- The steam boiler may also not be heating at all and will not build steam pressure, This could be due to a bad control board, bad stats (you can attempt to reset these to see if there is a change), bad pressurestat, or bad steam element. All of these would either have to be inspected for any loose wires or damage, if nothing can be seen visually then these components will need to be tested with a meter.
How to Diagnose Hot Water and Steam System Obstructions
Not Steaming and no Hot Water through group
Confirm that water is coming through the group head when the toggle switch is flipped.
Is the orange light coming on on the front of the machine and blinking?
- No.
- Is the machine plugged in and the power switch on?
- Yes. Move on to the next question
- No. Plug the machine in and turn the power switch on
- Visually inspect the high limit switch.
- Is it melted or broken? Replace it.
- If it is not broken, unplug the machine, and reset it.
- Power the machine on see if it heats
- Test the high limit switch for continuity.
- Does it have continuity?
- Yes. Move on to the next question.
- No. Replace the high limit switch.

How To Reset High-Limit Switches on a Profitec Pro 700 Espresso Machine
At this point if you have flow through the machine to the group head and there is no damage or the stat is not popped, the failure may be due to a bad control board, PID, or boiler element, static relay, or coffee/steam thermostat. Servicing your machine is suggested.
My steam pressure is low
- If you have flipped the steam switch and have given the machine at least 10 minutes to fully heat, check steam pressure. If the steam pressure is low, first remove the steam tip and inspect it to make sure it isn't blocked off from debris or old milk.
- The upper cup warmer should be removed and the stat should be inspected to make sure it is not popped or damaged. A damaged high limit can prevent a machine from heating passed a certain point. If it is popped the machine will not build steam pressure. Also inspect the non-resettable steam thermostat for damage and continuity.
- If all appears to be fine, the problem could be a result of a bad element, bad pressurestat, or control board.
I Have No Water Flow At All From The Group
Are you using a water softener?
- Yes. Remove it so you can test water flow without it.
- Make sure it is not floating and sucking in air.
- If old replace it.
- Flip the toggle switch, can you hear the pump? If the pump is not activating then it could be an issue where the machine is not sensing that the tank is in the machine, or the water tank is empty. The pump may also be faulty or the pump needs to be primed.
- If the pump is functional does it sound as if it is under pressure? If the pump sounds as if it is under pressure this may be a result of the brew solenoid being plugged. The brew solenoid will be found attached to the side of the group inside the machine. This can be taken apart and inspected to make sure there is not scale or debris blocking the channels that water passes through. You can also remove and clean the inside components of the solenoid.
- If the solenoid is clear of debris the shower screen and gasket should be removed and inspected. Is the shower screen filled with old coffee and is blocking flow? The dispersion plate can also be removed from the group head and the channel for the group can be seen to make sure that no visible blockage is present.
- If no signs are clear as to why there is not flow from the group then service should be recommended.
My brew pressure is low
Do you have the backflush disk in?
- This is the only true test of brew pressure. Coffee has too many variables. The backflush disk gives us a control model. With the backflush disk in, the gauge should rise to 10 bars in 9-11 seconds.
- Your brew pressure is truly low, and has been measured with the backflush disk in.
- Try running a test of the vibration pump, and adjusting the OPV.
- If the pump pressure is low. If the Pressure is low the adjustment for the OPV is located under the cup warmer. Remove the top of the machine. Run a brew pressure test and when pressure is built, use a flat head screwdriver to turn the OPV clockwise and counter clockwise to see if the brew pressure changes. If the brew pressure does not move, you may have a failed OPV.
- Try turning the OPV clockwise, did brew pressure increase? Did the pump get more quiet with a little bit increased pressure? Flip the switch, remove the portafilter, run some water through the group, replace the portafilter and hit the switch again, when it builds pressure, does it build to the newly adjusted pressure? If the pump became more quiet with the slightly increased pressure, and was unable to achieve the newly set brew pressure when running a second brew test. The pump maybe too weak and has failed.
The Pump Runs Continuously when Machine is Turned On
- Inspect the level in the tank, is the water level going down at all? If it is not and the pump sounds a bit loud it is likely the machine is not drawing in water from the tank. The intake line coming off the socket should be inspected to ensure it is not kinked and the pump may also need to be primed.
- It is possible that there is a blockage in, or zero activation of the intake solenoid. A sign of this is that the machines pump will sound as if it is under pressure and the water level in the tank would not be going down. This would be due to the water having nowhere to go. The solenoid can be taken apart and inspected and cleaned for any build up or blockages.
My machine is leaking
1. Is coffee coming up and over the portafilter?
- Replace the group gasket.
2. Do you hear a hissing sound?
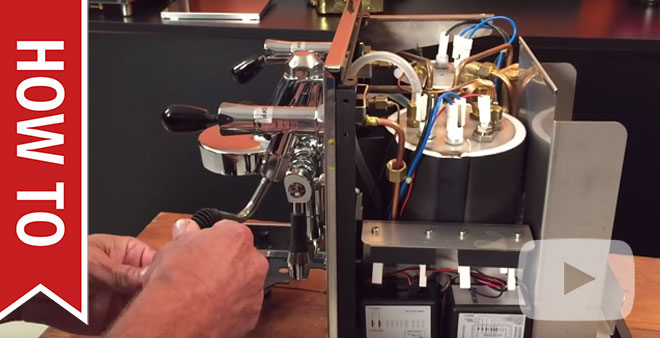
- The vacuum breaker is built into the pressurestat on these machines, it is all connected with rubber tubing that connects to the drain. If you hear hissing like steam is escaping, or see steam coming out of the front of the machine it is possible that the vacuum breaker is stuck open and is allowing steam past it. If you take off the top of the machine and were to look at the pressurestat you would be able to see steam in the line as well as hear the hissing. If this is happening you should turn off the machine, depressurize the machine, and then you can open the vacuum breaker portion of the pressurestat and remove the small components and clean them. If this does not stop it from happening the pressurstat/vacuum breaker combo unit needs to be replaced.
Cleaning the Vacuum Relief Valve
3. Is it steaming from above the machine through the vents on top?
- If there is steam coming from the top of the machine this would likely be due to a loose fitting. Or the safety valve has popped and is releasing pressure.
- Take off the top of the machine and inspect all fittings to see if a leak can be identified. Also inspect the safety valve on the top of the steam boiler. If the pressure has risen to the point where the safety has released it will be noticeable. Usually the safety can be heard releasing and and will continue spraying, also the gauge will show the increased pressure.
4. Is the leak coming from around the nut where the steam or hot water wand attaches?
- There is an o-ring in there. You can try to tighten the nut first. If that doesn’t stop the leak, take it off, and check on the o-ring that sits in there. The o-ring should be placed at the bottom of the nut resting in a channel on the inside of the nut. This will either be a rubber o-ring or teflon ring. It may either be worn or damaged and will require replacement.
5. Is it dripping or leaking out of the tip of the steam wand?
- Yes. It should leak or drip a little bit after use, and when the machine is first started up. This is normal, and due to condensation in the pipe. It should subside after a few minutes of non use.
- The valve has a shaft that runs through it and on the end of this shaft is a rubber gasket. If there is debris present in the valve, it will cause this rubber seal to not properly seat and will let water past it. The rubber gasket may also be dried out due to age, or has been ripped from being over tightened and will no longer seal off the valve when closed.
6. Is the leak coming from between the steam tip and the wand?
- There is a rubber o ring or teflon gasket in between them that may need to be replaced.
7. Is the leak coming from the boiler itself?
- Is it leaking from where a valve screws in to the boiler?
- Remove the valve, and clean any remnants of sealant. You can use teflon tape, Permabond, or locktite to reseal the valve back into the boiler.
- If the leak is coming from a weld point on the steam boiler then the boiler needs to be replaced.
- If the brew boiler is leaking, the brew boiler sits on top of and attaches to the group head, there is a gasket that sits betwen them. If water is present coming from this location between the boiler and the group than either the bolts need to be tightened, or the gasket is bad and requires replacement.
8. I cannot find the source of the leak.
- Run the machine to allow it to heat. Some leaks may only be apparent under heat and pressure.
- You can open the machine and send us any photos or videos, so we can determine if we can find the source of the leak.
- Send the machine in for service.
9. Is the leak coming from the bottom of the machine?
- Inspect the plastic reservoir valve socket. If it is cracked, it will need to be replaced.
Portafilter is too tight on brand new machine
- As long as water is not leaking around the portafilter from the group head, this is totally normal. Over time, the portafilter will wear in to a normal 6 o’clock position. It could take about a month or two. As long as it is making a good seal, then it is fine. In another year or so, the gasket will need to be replaced again, and may still be a little off center in the beginning.
My coffee tastes bitter or sour
Typically, issues with crema or the flavor of the shot do not indicate a malfunction of the machine. Instead, this indicates that an adjustment needs to be made in the brewing process or that different beans need to be used.
- Here is some helpful advice on Tamping.
- Making adjustments to the grind is going to have the biggest impact on the coffee extraction. If it is too coarse, the coffee is going to come through too fast, and not extract long enough.
- If the grind is too fine, it is going to extract for too long, results in really bitter shots.
- It is important to use fresh beans, typically beans roasted within the past two weeks are best. Light and medium roasts are best for espresso brewing and richer crema.